Git, Git Commands & GitHub Explained for Dummies

Heya! 👋 I love helping people, and one of the best ways I do this is by sharing my knowledge and experiences. My journey reflects the power of growth and transformation, and I’m here to document and share it with you.
I started as a pharmacist, practicing at a tertiary hospital in the Northern Region of Ghana. There, I saw firsthand the challenges in healthcare delivery and became fascinated by how technology could offer solutions. This sparked my interest in digital health, a field I believe holds the key to revolutionizing healthcare.
Determined to contribute, I taught myself programming, mastering tools like HTML, CSS, JavaScript, React, PHP, and more. But I craved deeper knowledge and practical experience. That’s when I joined the ALX Software Engineering program, which became a turning point. Spending over 70 hours a week learning, coding, and collaborating, I transitioned fully into tech.
Today, I am a Software Engineer and Digital Health Solutions Architect, building and contributing to innovative digital health solutions. I combine my healthcare expertise with technical skills to create impactful tools that solve real-world problems in health delivery.
Imposter syndrome has been part of my journey, but I’ve learned to embrace it as a sign of growth. Livestreaming my learning process, receiving feedback, and building in public have been crucial in overcoming self-doubt. Each experience has strengthened my belief in showing up, staying consistent, and growing through challenges.
Through this platform, I document my lessons, challenges, and successes to inspire and guide others—whether you’re transitioning careers, exploring digital health, or diving into software development.
I believe in accountability and the value of shared growth. Your feedback keeps me grounded and motivated to continue this journey. Let’s connect, learn, and grow together! 🚀
If you are new to the git technology, it may seem very confusing at first, especially if you learn from someone who doesn't know how to break the concepts down to the extent that even a five-year old can understand.
It is, therefore, my goal to explain the concept of git, github, and the commonly used git commands in such a way that you will grasp them and be able to use them efficiently even if this is your first time coming across them.
Let's get started but before then, I held a live session with some Software Engineering students from ALX-Africa where I explained the things I will be teaching here, so you can watch the video below to see me putting these to use.
What is Git?
Git is basically a technology that allows you to store multiple versions of your source code. It is therefore referred to as a source code management (SCM) technology or a version control system.
This technology helps solve a lot of problems that software engineers or developers faced prior to its inception. Two prominent problems that Git has solved for which you would like to use this technology are:
1. Tracking changes in a file and being able to revert to a specific instance of the file:
Hitherto, one needed to create multiple files or duplicate existing files before making changes to them if they wanted to track the changes over time.
This means that you will have a lot of files at the end of the day. Comparing these files to track changes made also becomes a herculean task.
With the power of Git, you will work without the need to create multiple copies of the file and still be able to track the changes made over time. It works by snapshots of the work and saving them as versions (to which you can revert to at any time).
You can also easily compare these versions any time you want and see the changes that have been made in the various versions.
2. Ensuring effective collaboration between team members who are working on the same project:
Imagine working with a team on the same project. If your team members happen to work remotely or on different computers at the same time, how will you be able to consolidate the codes and have them in the right order.
You may argue that this could be done manually, and I don't dispute that, but can you imagine the stress you will go through just to synchronize the work? What if there are hundreds of people contributing to the code?
With the power of Git, all team members can work together and get their code synchronized in almost real-time. Conflicts that may arise can be easily resolved with little to no manual work.
----------------------------------------------------------
Yes! That is how powerful Git is and there are other services that when combined with Git, makes your version controlled codes available to you everywhere you go and also facilitate the collaboration between remote teams.
Some of these services include:
- GitHub
- GitLab
- BitBucket
In this post, I will focus on GitHub, but know that the three services mentioned above are very similar and use similar concepts, if not the same. Let's now take a look at what GitHub is.
What is GitHub?
GitHub is a platform that allows developers to host their version-controlled projects or code. It is therefore a service that allows you to easily manage your files that are being tracked by Git and facilitate collaboration between teams.
You can therefore say that Git is the underlining technology that allows you to track changes in your source code and create versions of them, while GitHub is a platform that helps you manage your version-controlled code.
You can also see it from this angle: you use Git to create versions of your code, then you upload those versioned files to a website called GitHub.
I hope it makes sense to you.
To efficiently use Git and GitHub, you need to know the various Git commands and what they are used for. But before I get to those, let's take a look at some terminology that you need to know to make it easy for you to work with Git.
Terminologies that you need to know to work with Git
Working directory: This refers to the directory where you are saving your source codes. It is basically your project folder.
Repository: This refers to the directory (or folder) in which the various versions of your code that you create are stored. Note that your working directory is not a repository by default, but you can turn it into a repository by initializing Git in it.
NB: All the codes or project files will by default be in the working directory. Once, you initialize git in that directory, making it a repository, you can begin to track the changes.
Staging area: Anytime you are ready to take a snapshot of your code (in other words, create a new version), you have to add the files that you want to track (ie: those with recent changes in them) to what we call the Staging area.
The staging area is therefore like a platform or podium where you make people mount just so you can take a picture of them.
Local repository: After initializing git in your project's folder, you create a repository which only sits on your own computer. Such a repository is called a local repository. Hence, all the versions that you create will be stored in your local repository.
Remote repository: As I mentioned earlier, services like GitHub, GitLab and BitBucket allow you to host your version-controlled projects. That means that you create a repository on any of these platforms and then upload your code there. The repositories on any of these platforms can therefore be referred to as remote repositories.
You can connect the remote repository with your local repository so that any time you create a new version in your local repository, you can easily push it to the remote repository.
Staging: The process of adding files to the staging area so they can be committed to the local repository.
Committing: The process of creating a new version or taking a snapshot of the files that have been staged and saving them in your local repository.
Pushing: The process of sending version-controlled files from your local repository to a connected remote repository.
Pulling: The process of getting version-controlled files from the remote repository to a local repository. Pulling is therefore the opposite of pushing.
Cloning: This refers to the process of downloading a repository from any of the platforms used to host repositories unto your own computer.
The difference between cloning and pulling is that, with cloning, you are downloading the whole repository. This is a repository that you don't already have on your computer.
However, with pulling, you are just fetching the changes or updates from the remote repository and merging them with the files that you currently have in your local repository. In order to pull from a repository, you must have a local copy of that repository already.
Forking: This refers to copying someone else's remote repository from any of the websites (GitHub, GitLab, BitBucket) into your own account. After forking, you will have a copy of that same repository in your own account.
It's important to note that you can equally clone another person's account but the difference between forking and cloning is that, with cloning, you download the repository to your local computer whiles with forking, you copy it to your own GitHub (or any of the others) account.
That means that forking, wouldn't give you a local copy of the repository. But then, you can forked someone's repository and follow it with a clone. By doing this, you will have a copy of the person's repository in your Github account and also have a copy on your computer.
Now that you understand these terminologies, we can move on to the git commands.
Git commands, what they do and how to use them
Let me group the git commands into their use cases:
- Creating repositories
- Syncing repositories
- Making changes
- Parallel development
Note: All git commands begin with the word git
Creating repositories
git init: This is used to initialize a repository. That means, if you already have a directory or folder that you are working in and want to turn that folder into a git repository, you can run
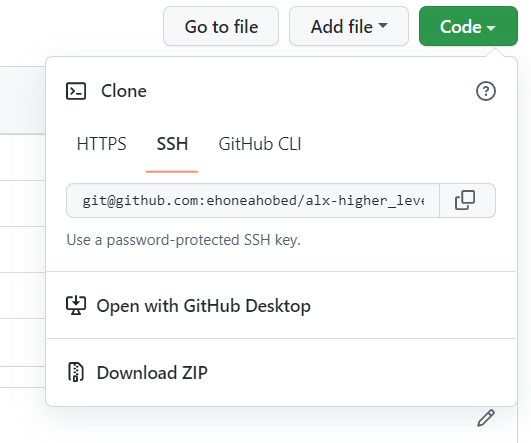
git initcommand on your terminal (after changing directories to that specific directory).git clone: This is used to download a remote repository. To use this command, you must provide the URL to the remote repository. There are two main protocols that can be used in this case: HTTPS or SSH.
With the HTTPS protocol, your URLshould contain your personal access token whiles you don't need that with the SSH protocol. However, to use the SSH protocol, you need to establish an SSH connection with the GitHub servers before.
Check this article out to create the connection to GitHub servers with the SSH protocol.
With SSH, your command will look like this:
git clone git@github.com:username_of_account/repository_name.git
With HTTPS, your command will look like this:
git clone https://your_personal_access_token@github.com:username_of_account/repository_name.git
Making Changes to repositories
git status: This command is used to check the status of files. It will tell you which files have not been tracked yet (yet to be staged), those that have been tracked but are yet to be committed or whether all files have been committed already.
git add: This is the command you use for staging. This means that, you use this command to add files to the staging area so you can begin tracking them.
git commit: This is the command you use to create the versions of your code and store them in your local repository. In essence,
git commitis used to move files from the staging area to the local repository.
To use git commit, you have to add a message that will indicate the changes that you have made. This message is important because it tells your team mates or your future self, why you decided to save that version. It may also give information on why those changes where made.
The format therefore is git commit -m 'your commit message goes here'.
Syncing Repositories
This set of commands helps us synchronize the remote repository and the local repository.
git remote add: This command is used to add a remote repository as the origin to a local repository. This means that you are establishing a connection between the remote repository and the local repository so that you can easily push your files from the local to the remote repository.
To use this command, you have to provide the URL for the remote repository. The format will therefore look like
git remote add origin https://github.com:username_of_account/repository_name.gitIn some cases, you would have to set the branch that you want to push it to. We will look at branches later so let's stick with this for now.
git push: This command is used to push the files or changes made from the local repository to the remote repository.
git pull: This command is used to fetch any changes that have been made in the remote repository and merge them with the current files in the local repository. This command becomes extremely important when you are collaborating with others. You use this command to get all the new changes that your colleagues may have made.
Git pull as you saw does two things, it fetches the changes and merges it with what you have locally. This can therefore be broken down into 2 git commands: git fetch and git merge.
git fetch: This command is used to fetch the changes that can be found in a remote repository.
git merge: This command is used to merge the changes that were fetched from a remote repository into the local repository.
Parallel development
Over here I will discuss commands like git branch, git merge, etc but I am feeling tired now and would like to continue at another time.
Come back later to check for the updates.
Conclusion
It was not until I started using git and github on a regular basis that I understood it better. So, I encourage you to start practicing with the knowledge you have gotten from this and build upon it.
Regular practice will make you the genius you are looking for to become. If you have any questions, ask in the comments and if you would like to connect with me, you can reach out via @ehoneahobed on twitter.
All the best.