How to create a basic Django Project - Set up
Step-by-step guide to set up a Django project

Heya! 👋 I love helping people, and one of the best ways I do this is by sharing my knowledge and experiences. My journey reflects the power of growth and transformation, and I’m here to document and share it with you.
I started as a pharmacist, practicing at a tertiary hospital in the Northern Region of Ghana. There, I saw firsthand the challenges in healthcare delivery and became fascinated by how technology could offer solutions. This sparked my interest in digital health, a field I believe holds the key to revolutionizing healthcare.
Determined to contribute, I taught myself programming, mastering tools like HTML, CSS, JavaScript, React, PHP, and more. But I craved deeper knowledge and practical experience. That’s when I joined the ALX Software Engineering program, which became a turning point. Spending over 70 hours a week learning, coding, and collaborating, I transitioned fully into tech.
Today, I am a Software Engineer and Digital Health Solutions Architect, building and contributing to innovative digital health solutions. I combine my healthcare expertise with technical skills to create impactful tools that solve real-world problems in health delivery.
Imposter syndrome has been part of my journey, but I’ve learned to embrace it as a sign of growth. Livestreaming my learning process, receiving feedback, and building in public have been crucial in overcoming self-doubt. Each experience has strengthened my belief in showing up, staying consistent, and growing through challenges.
Through this platform, I document my lessons, challenges, and successes to inspire and guide others—whether you’re transitioning careers, exploring digital health, or diving into software development.
I believe in accountability and the value of shared growth. Your feedback keeps me grounded and motivated to continue this journey. Let’s connect, learn, and grow together! 🚀
I started learning about using the Django framework for web development a few days ago. The challenge that I am having is trying to remember the individual steps used to set up the project.
I know I don't necessarily need to memorize the steps, but I can't keep going back to the YouTube tutorials every now and then. More importantly, I know I am not the only one who has this problem.
I am, therefore, writing this article that will be my go-to guide any time I want to set up a new project until I find them on my finger tips.
Django is a Python framework and requires Python to work. Hence, you need to make sure you already have Python installed before starting with this project. If you don't know how, check out the official site.
I am going to presume that you have Python already installed and proceed from there.
For those who do not know, Django is a framework that allows you to develop websites or web apps using the Python language. It comes out with a lot of the work already done for you and helps improve the security of your projects.
If you are therefore looking for a way to build websites or web apps with Python (using Django) then this will be a good starting point for you.
Step 1: Create a virtual environment for your project
As a Django developer, you are likely to develop a number of Django projects in your life. Because Django or even Python keeps being updated with time, there is a possibility of having a number of projects which use different Django or Python versions.
Also, for each project, you may need to install specific packages. These packages also comes in various versions, and hence having a virtual environment helps you to isolate the packages for the use by the respective project only.
It is therefore recommended that you don't install these globally. By creating a virtual environment for each project, you isolate each project such that they can all have their own Django versions and packages without giving you any issues.
To create the virtual environment, you need to install a package called virtualenv. Open a terminal on your computer and type the code below to install the virtual environment package if you don't already have it installed.
pip install virtualenv
Once, you have this package installed, you can proceed to create a virtual environment for the project you are about to start.
To create an environment, type the command below into your terminal.
virtualenv myblog_env
Where myblog_env is the name you are giving to your virtual environment and can be changed to anything of your choice. It's a good practice to have env as part of the name so you always know what and why you have that directory when created.
You will now have a new directory created called myblog_env and have a few files and directories in it.
Step 2: Activate your virtual environment
Once the virtual environment is created, you will need to activate it. There is a file inside the directory that was created that you will use to activate. To do that, run the command below:
source myblog_env/bin/activate
Immediately after the activation, you will find that your default prompt on your terminal has a new portion at the beginning. The name of your virtual environment will be put in parenthesis and placed in front of your terminal's prompt.
Something like this:
(myblog_env) $:
Note that yours may be a bit different depending on what your original prompt looked like, but you will have the (myblog_env). Having that indicates that your virtual environment is active.
Make sure that it is active anytime that you are working on your project. Anytime that you find it no to be active, you just have to run the same code above to activate it.
Also, any point in time, you can deactivate the virtual environment by just running the deactivate command.
(myblog_env) $: deactivate
Step 3: Install Django
Now that we have our virtual environment set up, we can go ahead and install the Django framework. To install Django, run the command below:
(myblog_env) $: pip install django
This installs the latest stable Django version available. If you need to install a specific Django version, then you would have to indicate the exact version you want when installing it. You can check out this issue on stackoverflow to see how to install a specific version of Django.
Once you have Django installed, you get access to the django-admin tool that enables you to perform some important tasks like creating a new Django project.
Step 4: Create/Start a Django project
After installing Django, you need to start a new Django project and you can do that by running the commnand below;
(myblog_env) $: django-admin startproject myblog
Where myblog is the name of the project you are creating. This action will create a new directory called myblog. Inside this directory, you will find a file called manage.py. That file is very important and will be used for running various administrative tasks like initializing databases, creating databases, creating a superuser etc.
Inside this directory, you also find a subdirectory with the same name (myblog in my own case). Inside the subdirectory, you will find about 5 different files. Each of them has its importance and may come in handy in the course of your development. We will therefore learn about them once we need to use them.
Step 5: Migrate your database
Whenever you create a new Django project like we have just done, you automatically have an admin site set up for you. However, we need to set up our database for it to work.
By default, Django is configured to use the sqlite database. You can always change this to any type of database that you want but for now let's keep using what's already available.
Since a site has already been created for us with it respective database details. We will need to put that database in order. We do that by migrating the database.
To migrate the database, we are going to make use of the manage.py. To use this file, you write a command starting with python followed by `mange.py and then the name of the actual command you want to execute.
So, let's open the new directory that was created for us before running those commands.
(myblog_env) $: cd myblog
Once inside that directory, we can go ahead and run the manage.py commands. The comand for migrating is as follow:
python manage.py migrate
Right after successfully running that script, you will now find an additional file db.sqlite3 in your project directory. That happens to be your database file.
Step 5: Create a Superuser
Now, that the database is set up, we need to create a superuser in order to access the admin site. We do that also with the manage.py commands. The command for creating a super user is as below:
python manage.py createsuperuser
You will then be prompted to type the details for the super user. These details include:
Username:
Email address:
Password:
Password (again):
Once you provide all of the above details, the superuser will be created successfully.
Great work so far. In order to see what we have created so far, we need to have a server up and running.
Step 6: Run the development server
One other manage.py command is runserver and it helps us start a development server so we can preview the project we are working on. Therefore, to start the server, run the command below:
python manage.py runserver
This command starts a local development server on port 8080 by default. This means that you can now access the website that you have created with the url https://127.0.0.0:8080/
You will have access to the website for as long as the server is on. As soon as the server is closed, you lose access to the site and you may have to start it again if you want to.
To quit the server, just use the keyboard shortcut, ctrl + c
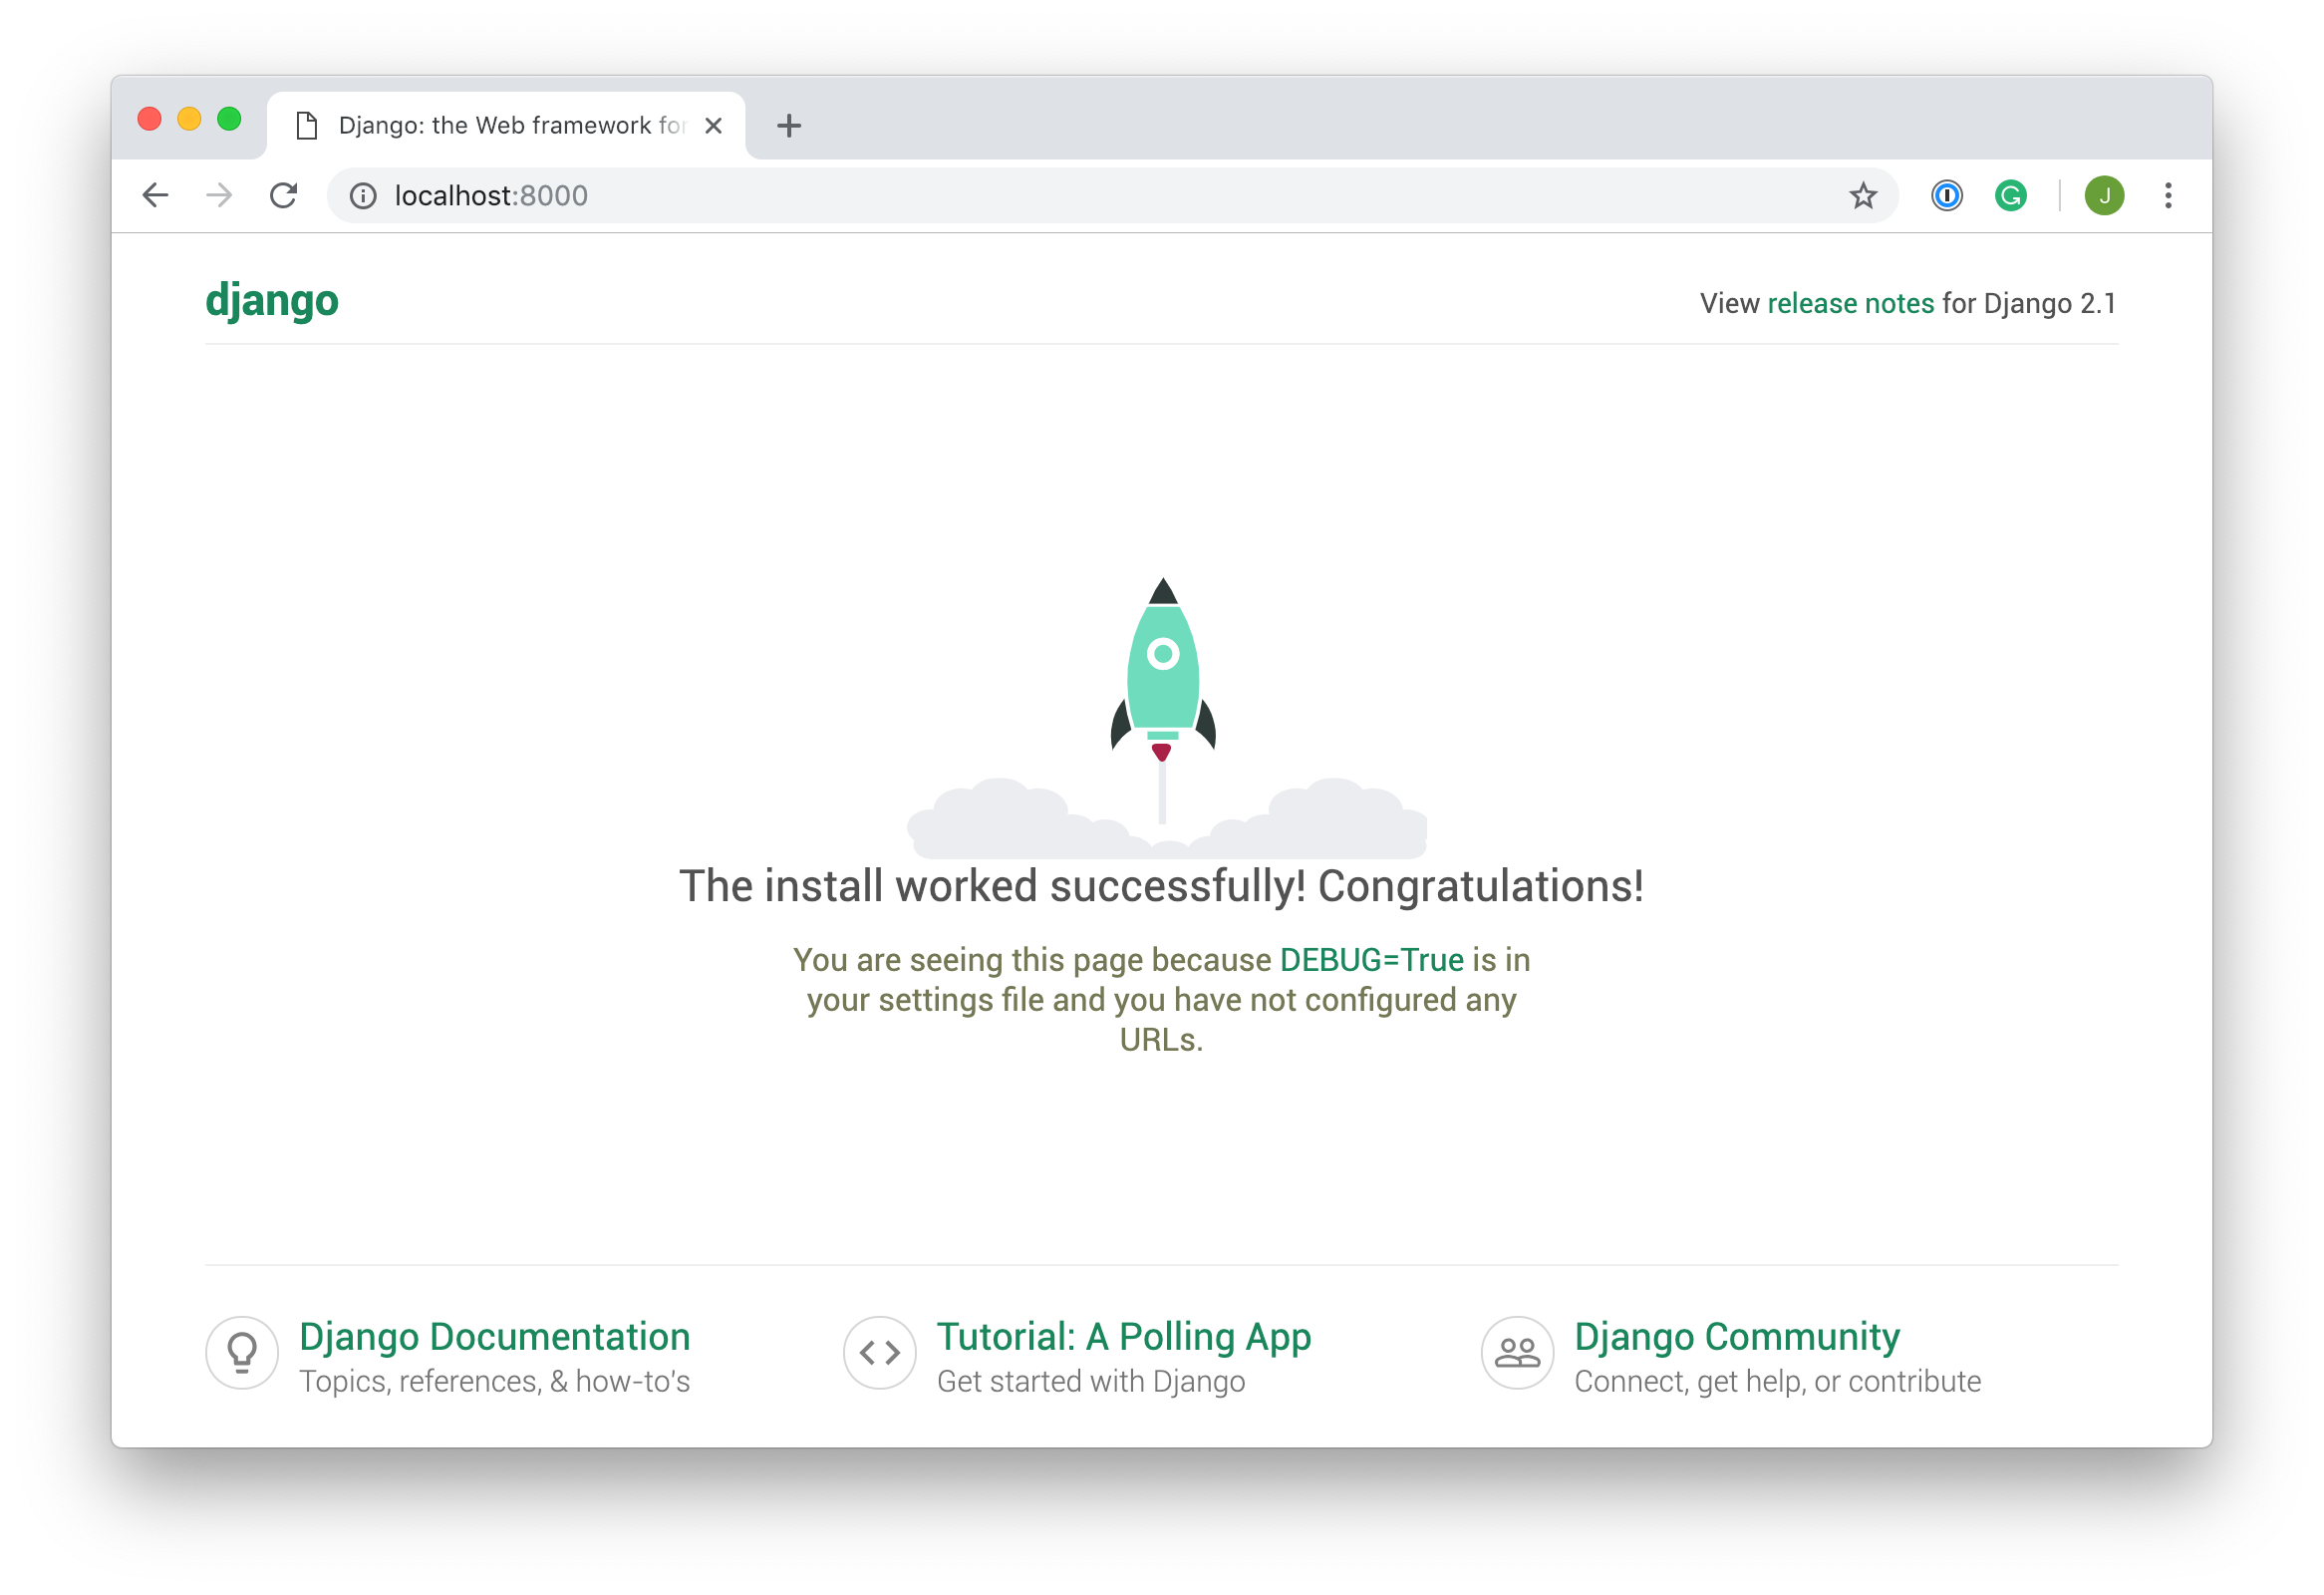
Step 7: View your website in a browser
Once the server is up and running, click on the link or copy and paste the link https://127.0.0.0:8080/ into a browser and you will have the website showing as below:
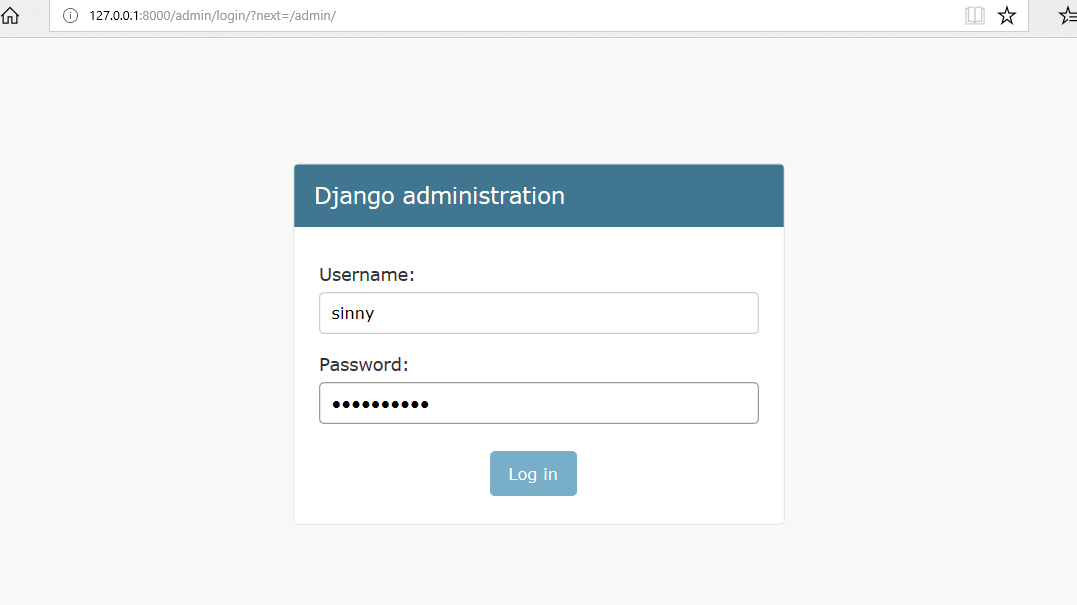
Step 8: Log in to the admin dashboard
I hope you still remember your super user login details that you used? Now you can access the admin dashboard by visiting the admin site and entering your superuser details. You can access the admin site with the site https://127.0.0.0:8080/admin.
After visiting that link, you will find something like shown below:
After you successfully log in, you will be greeted with a dashboard that looks like the image shown below:
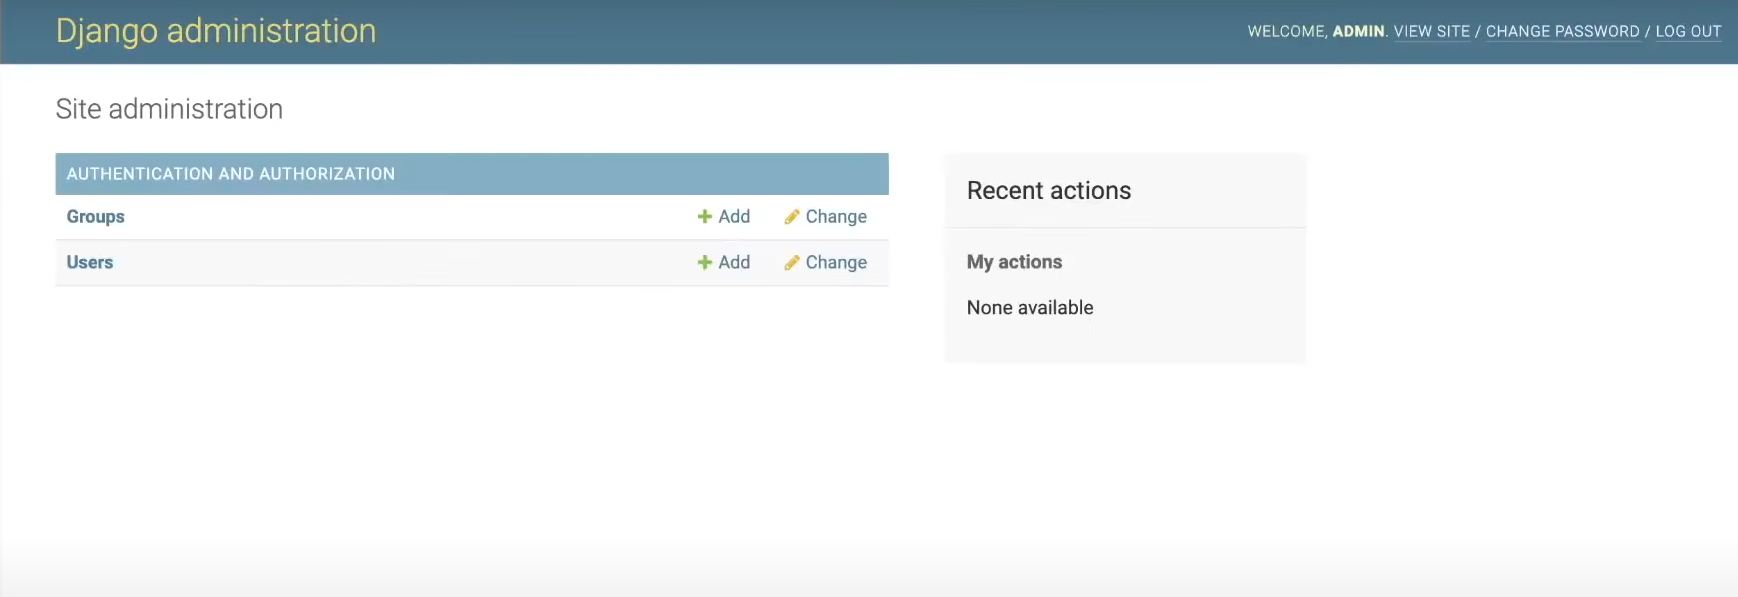
Congratulations! You have successfully set up your first Django website.
Summary of all the commands that were used to set up the project
Here is an ordered list of all the commands that I used in setting up this Django project.
1. pip install virtualenv
2. virtualenv myblog_env
3. source myblog_env/bin/activate
4. pip install django
5. django-admin startproject myblog
6. python manage.py migrate
7. python manage.py createsuperuser
8. python manage.py runserver
Conclusion
Just as I stated in the beginning, this post is focused on setting up the basic Django website. It is to serve as a quick guide to help anyone that wants to easily remember the steps for setting up a Django project.
Now that we have the backbone set up, I can go ahead and explore more advanced projects in Django. As I keep learning, I will do well to share some of the projects that I work on in the form of blog posts or videos.
So, do follow this blog and also subscribe to my YouTube channel to get updates whenever I release a video.
I invite you to connect with me via twitter if you are active on Twitter and I would love to hear from you and hear about your development journey as well. All the best.